Have you ever had that moment? That pure shot of developer dopamine when you finish your last feature and think, “I built this.” It feels amazing. But then, a tiny voice whispers, “…now how do I get this thing on the internet?” If that sounds familiar, you’re in the right place. Getting my first Laravel React CRUD app online felt like a huge mountain to climb, turning excitement into anxiety. But I conquered it, and now I’m here to guide you through the entire deployment journey.
I’m Charles, and this is the no-fluff, step-by-step guide I wish I had. We’ll demystify the process of taking your app from localhost to a live URL you can share with the world. Let’s get started!
Table of Contents
The Pre-Flight Checklist: Prepping Your App
Before you even think about renting server space, you need to get your house in order. Think of it like packing for a trip—a little preparation goes a long way.
First, Git is your best friend. If you aren’t using version control, stop and learn the basics now. Committing your final, working code to GitHub or GitLab is the foundation of a sane deployment strategy. It’s your safety net and your time machine.
Next, let’s talk about the .env file. This file holds your secrets: database passwords, API keys, and app URLs. It should never be committed to your Git repository. Ensure your .gitignore file includes .env. Instead, create a .env.example file as a template, listing all the variables your app needs with placeholder values. This single step of proper env file configuration will save you countless security headaches.
Finally, clean up your project. Run your tests one last time and remove any stray dd() or console.log() statements. If you need a refresher on setting up a clean local environment.
Check out my other posts –
- The Digital Foundation: Why Every Business MUST Have a Domain and Hosting in 2025 (Complete Guide)
- Lubuntu vs Linux Mint XFCE: The Ultimate 2025 Performance Showdown
- Fix the Frustrating Failures When You Deploy Next.js on Plesk (2025 Guide)The Ultimate Guide to Deploy Next.js on Plesk (2025 Fix)
Choosing Your Battlefield: Shared Hosting vs. a VPS
Okay, your code is prepped and ready. Now, where will it live? This is a major fork in the road, and your choice largely comes down to budget versus control.
The Shared Hosting Route (DigitalNodi)
For a lot of folks just dipping their toes into deployment, a Plesk setup with Laravel seems like the path of least resistance. And why wouldn’t it? You get a nice, clean graphical interface where you can just upload your files and click a few buttons to spin up a database.
It’s an attractive option, for sure. It’s cheap, you don’t need a PhD in server management, and it generally just works. But there’s a catch, isn’t there always? You’re basically renting a room in a crowded apartment. The resources are shared, which can mean your app slows to a crawl if your neighbor is throwing a digital party. On top of that, bending Laravel’s specific directory structure to fit the mold of a generic shared host can feel like trying to solve a Rubik’s cube in the dark.
Taking the Plunge with a VPS (Think DigitalOcean, Linode & the Like)
A Virtual Private Server (VPS) is like owning your own plot of land where you build the house. A DigitalOcean deploy gives you a clean Linux server. You have root access. You control everything.
So, what do you get for going this route? Well, you’re basically handed the keys to the whole kingdom. You’re in the driver’s seat—we’re talking complete and total control over your setup. And since you aren’t stuck sharing your server’s power with a bunch of other people, everything just runs so much better. It’s a real night-and-day difference in performance.
But here’s the kicker: it forces you into a professional workflow. You’ll find yourself managing your project exactly how it’s done in the real world, which is an incredible skill to build.
You are responsible for everything: server setup, security, and updates. The learning curve is much steeper.
My advice? Don’t be afraid of the VPS. The skills you learn in a proper VPS setup for Laravel are invaluable. There are tons of amazing tutorials, like this LEMP stack guide from DigitalOcean, to help you get started.
The Deployment Dance: Taking Your Code to the Big Stage
Alright, you’ve built your masterpiece locally. Now it’s time to let the world see it. Getting your Laravel backend and your React frontend to play nice together in a live environment is the real final boss.
Let’s break it down.
First, Tame the Backend
If you’re on a Virtual Private Server (VPS), this is where using Git becomes your superpower. You’ll just pop into your server using SSH, head over to your web directory (usually something like /var/www/html), and pull your project right down from its repository. It’s so much cleaner than fiddling with FTP.
Bash
# Get into your server
ssh your_user@your_server_ip

# Go to the web folder and grab your code
cd /var/www/html
git clone your_repository_url.git
Once your code has landed, it’s time to run a few familiar commands inside that new project folder. Think of it as waking the application up:
composer install --optimize-autoloader --no-devto get all the necessary PHP packages, but none of the dev junk you don’t need in production.- Copy your
.env.exampleto a new.envfile and plug in your live database details. php artisan key:generateto give your app its unique secret key.php artisan migrate --forceto build out your database schema.php artisan storage:linkto make sure your publicly accessible files are, well, accessible.- Finally, you’ll need to tweak file permissions on the
storageandbootstrap/cachefolders so the server can actually write to them.
Now for the Frontend… And the Part That Trips Everyone Up
This next bit is where I see so many people get stuck. I know I did. Your local Vite dev server is a tool for development, not production. For a live environment, you need to perform a React build process. This process tells Vite to take all your .jsx files, CSS, and images and bundle them into a few highly optimized, static files that any browser can understand.
The magic command is:
npm run build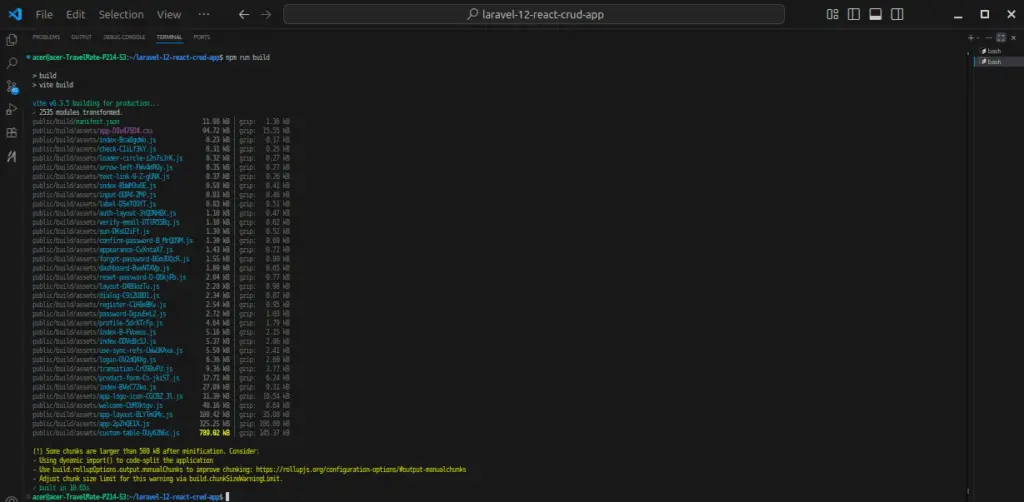
When you run this, Vite creates a public/build directory containing your production assets. If you’re using Inertia.js, Laravel automatically knows how to use these files. The most professional approach is to run npm install and npm run build on your server right after you pull your latest code.
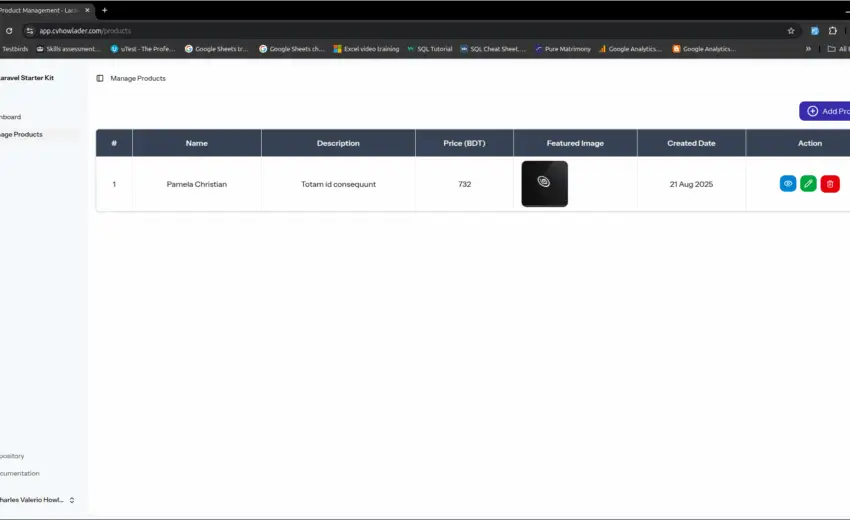
Troubleshooting My First Laravel React CRUD App Deployment
I want to share a story from deploying my first Laravel React CRUD app. I had followed all the steps on my VPS. I cloned the repo, ran composer, configured the .env file, and ran npm run build. I pointed my Nginx server block to the public folder and held my breath.
I visited my domain and… a 404 error. My heart sank.
We’ve all been there, right? Staring blankly at the terminal, eyes glazing over as the logs just keep scrolling. My app kept spitting back that infuriating 404 error, and for the life of me, I couldn’t figure out why. The weird part? The homepage worked flawlessly. It was only when I tried to jump straight to a deep link—you know, something like mydomain.com/users/5—that the whole thing just fell apart. What gives? Total failure. It turns out my server had no clue what to do. It was looking for a physical file or folder named /users/5 that, of course, didn’t exist because React Router was supposed to be handling all that navigation on the client-side.
The fix, after all that headache, was laughably simple. A tiny but absolutely critical tweak to my Nginx configuration file:
Nginx
location / {
    try_files $uri $uri/ /index.php?$query_string;
}
This little snippet is pure magic for Single Page Applications (SPAs). It’s like telling the bouncer at a club, “Hey, if you don’t recognize this person’s name on the list, just send them over to me at the main table, and I’ll figure it out.” It tells the server, “If you can’t find a file that matches the URL, don’t panic. Just pass the request over to index.php.” Laravel then boots up, loads your React app, and your frontend router takes the wheel to show the correct page. That breakthrough felt more rewarding than building the entire app!
You’ve Totally Got This
Pushing your first real, full-stack application out into the wild is a massive milestone. And then comes that moment. It’s the point where your project magically sheds its skin, transforming from just another folder tucked away on your hard drive into something real. Something alive. It’s officially out there in the wild, a living, breathing thing on the internet for anyone to see.
So, when it’s your turn, just remember the core game plan:
- Keep your code clean and ready with Git and a proper
.envfile. - Pick the right home for your app (seriously, learning your way around a VPS is a skill that pays dividends).
- And never forget it’s a two-step process: First, get the Laravel API running. Then, build your React frontend for production and teach your server how to handle its routes.
- Be patient with troubleshooting. The answer is almost always in your server logs.
That journey is one of the most rewarding experiences in web development. What’s been your biggest deployment roadblock or “aha!” moment? Share your stories in the comments below!

August 21, 2025
Lubuntu vs Linux Mint XFCE: The Ultimate 2025...
August 21, 2025
JulianNuh March 3, 2026
https://colombocar.com/
Charles Valerio Howlader March 8, 2026
Thank you for sharing!